> ## Documentation Index
> Fetch the complete documentation index at: https://docs.okeanai.ru/llms.txt
> Use this file to discover all available pages before exploring further.
# Skills
> Give Craft reusable instructions, examples, and files for repeatable work
Skills teach Craft **how to do a kind of work**. A skill can provide a workflow, quality standards, examples, templates,
scripts, and other supporting files that Craft can reuse across sessions.
For example, a slide skill can tell Craft how to choose layouts, apply a template, validate the finished deck,
and save the presentation in the right format. You provide the goal and source material; the skill provides the method.
Skills do not connect external accounts or hold credentials. To let Craft read from or act in tools like Slack, Gmail,
or GitHub, connect an [App](/overview/core_features/craft_apps).
 ## How Craft uses skills
Craft can choose an available skill automatically when your request matches its description.
You can also select one explicitly when you want Craft to follow a particular workflow.
In a Craft session, select **+**, then **Skills**, and choose a skill.
You can also type **/** followed by the skill name. The selected skill appears as a chip above the input.
Tell Craft what to produce and provide the audience, source material, and requirements that matter.
Selecting a skill does not replace a clear prompt.
Craft reads the skill instructions before doing covered work. Review the result,
then ask for changes in plain language.
| Goal | How to use a Skill |
| ------------------------------- | ------------------------------------------------------------------------------------------------------------------------------------------ |
| **Build a presentation** | Select the `pptx` Skill, attach a company deck as a template, and ask Craft to build a presentation from your source material. |
| **Search company knowledge** | Ask a company-specific question and let the `company-search` Skill retrieve information you already have permission to access. |
| **Navigate a website** | Select the Browser Skill and ask Craft to open a site, follow links, interact with pages, or take screenshots. |
| **Generate a visual** | Select the image generation Skill and describe the subject, composition, style, aspect ratio, and where the visual will be used. |
| **Standardize repeatable work** | Use a custom Skill to capture your team's process for reports, briefs, reviews, or another workflow you want Craft to repeat consistently. |
## Browse and inspect skills
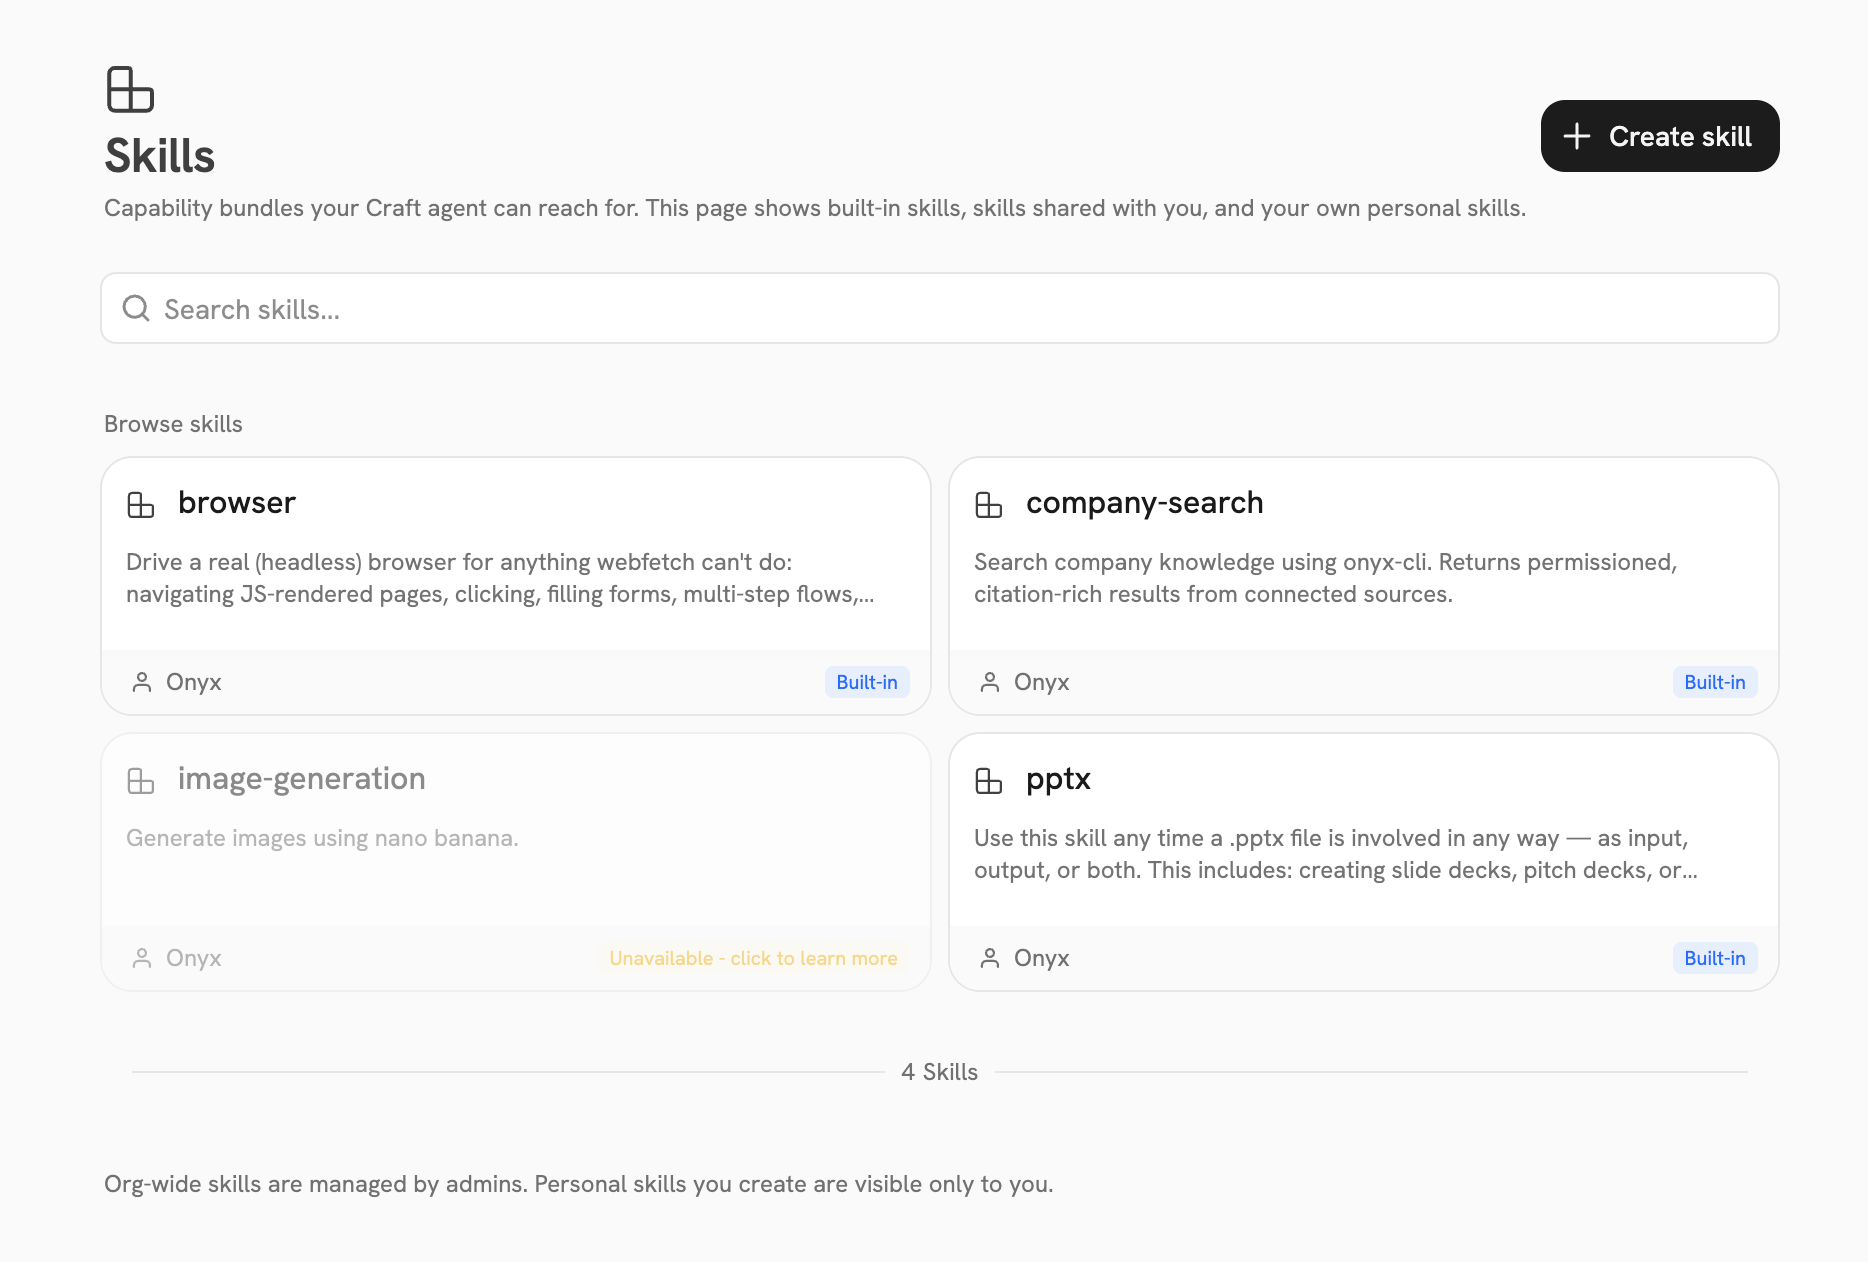
Open **Skills** from the Craft sidebar to search everything available to you.
Select a skill card to preview its instructions before using it.
| Label | What it means |
| --------------- | -------------------------------------------------------------------------------------------- |
| **Built-in** | Maintained by Onyx. Availability can depend on your deployment and configured providers. |
| **Custom** | Created in your organization and shared with you, your group, or everyone. |
| **Personal** | Created and owned by you. It starts private, but you can share it if your permissions allow. |
| **Unavailable** | Visible for reference, but Craft cannot use it until its dependency is configured. |
Built-in skills currently cover presentations, company search, image generation, and website navigation.
The exact list you see depends on what your organization has enabled.
A skill's description tells Craft when to use it. If Craft repeatedly misses a custom skill,
make the description concrete about the tasks it covers, or select the skill explicitly in your prompt.
## Create a personal skill
Create a personal Skill when you have instructions, examples, or reference files you want to reuse across sessions.
Open **Skills**, select **Create skill**, then choose how you want to begin:
| Starting point | Choose | What happens |
| ----------------------------------- | ---------------------- | ------------------------------------------------------------------------------------------------------- |
| You want to write the Skill in Onyx | **Start from scratch** | The Skill editor opens so you can write the details and instructions, then add supporting files. |
| You already have a Skill | **Upload a skill** | Upload `SKILL.md`, a ZIP, or a Skill folder. Onyx reads the instructions and creates the Skill for you. |
Every new Skill is personal and private. After creating it, you can share it from the Skill editor.
### Start from scratch
Enter a name and describe when Craft should use the Skill. Onyx uses the name to create the Skill's identifier,
converting spaces and punctuation to hyphens when needed.
Describe the workflow Craft should follow, including important constraints, expected outputs, and checks.
Switch between the Markdown editor and preview to review the finished instructions.
Add references, examples, templates, scripts, or assets under **Supporting files**. You can select files or a ZIP,
or drag in a folder. Onyx unpacks ZIP files and preserves the directory structure.
Select **Create**. Onyx saves the instructions as `SKILL.md` and opens the Skill editor, where you can manage files,
sharing, and availability.
If you already have a Skill,
use **Import skill** at the top of the creation page to fill in the form and add its files.
If you have already entered content, Onyx asks before replacing the name, description, instructions,
and supporting files with the imported Skill.
### Upload an existing Skill
Upload `SKILL.md` directly when the Skill contains instructions only. When it includes supporting files,
upload a ZIP or drag in a folder with `SKILL.md` at the top level.
```text theme={null}
weekly-customer-update/
├── SKILL.md
├── examples/
│ └── finished-update.md
└── templates/
└── update-template.md
```
At minimum, `SKILL.md` needs a name and description in YAML frontmatter, followed by the instructions Craft should use:
```md theme={null}
---
name: Weekly customer update
description: Create a concise weekly customer update from meeting notes and account activity.
---
# Weekly customer update
1. Summarize material changes since the previous update.
2. Separate customer decisions, open risks, and next steps.
3. Name an owner and due date for every next step.
4. Follow the format in `templates/update-template.md`.
```
Put the instructions in `SKILL.md` and keep supporting files in the same folder. For a folder or ZIP,
use a lowercase, hyphenated name such as `weekly-customer-update`; that name becomes the Skill's identifier.
For a standalone `SKILL.md`, Onyx creates the identifier from its frontmatter `name`.
Open **Skills**, select **Create skill** > **Upload a skill**, and select `SKILL.md` or a ZIP.
You can also drag `SKILL.md`, a ZIP, or a Skill folder into the upload area. Upload one Skill at a time,
then select **Create**.
Onyx opens the Skill editor after creating it. Review the name, description, instructions,
and file tree before using or sharing the Skill.
### Update a Skill
Open a personal Skill to edit its name, description, or instructions. Under **Supporting files**, you can:
* Add individual files, ZIP files, or folders. New files are added to the existing bundle, and matching paths are
replaced.
* Browse the bundle as a directory tree and remove files you no longer need. `SKILL.md` cannot be removed.
* Upload content that includes `SKILL.md` to replace the current name, description, instructions, and files. Onyx asks
you to confirm before replacing the existing Skill content.
Changes are synchronized to people who can use the Skill. You can also disable the Skill without deleting it,
change its sharing, transfer ownership, or delete it.
Never put passwords, API keys, tokens, or production credentials in a skill bundle.
Use [Apps](/overview/core_features/craft_apps) for authenticated access to external services.
Review every script and file before uploading a bundle you did not create.
## Troubleshooting
Confirm the skill is enabled and shared with you. Unavailable built-in skills do not appear in the session picker.
If the skill depends on a model or deployment feature, ask an admin to configure that dependency.
Select the skill from **+** > **Skills** or type **/** and choose it before sending your prompt.
Also name the desired output and important constraints; a skill supplies a method, not the goal itself.
Upload one Skill at a time. Put `SKILL.md` at the top level of the folder. In a ZIP,
place it at the archive root or directly inside one enclosing folder.
Confirm that its frontmatter contains non-empty `name` and `description` fields. For a folder or ZIP,
check that its name is lowercase and hyphenated. If you started from scratch, try a different Skill name.
A custom Skill cannot use the same identifier as an existing or built-in Skill.
Publish organization skills, configure availability, and review custom bundles.
Give Craft controlled access to external tools and approve actions safely.
## How Craft uses skills
Craft can choose an available skill automatically when your request matches its description.
You can also select one explicitly when you want Craft to follow a particular workflow.
In a Craft session, select **+**, then **Skills**, and choose a skill.
You can also type **/** followed by the skill name. The selected skill appears as a chip above the input.
Tell Craft what to produce and provide the audience, source material, and requirements that matter.
Selecting a skill does not replace a clear prompt.
Craft reads the skill instructions before doing covered work. Review the result,
then ask for changes in plain language.
| Goal | How to use a Skill |
| ------------------------------- | ------------------------------------------------------------------------------------------------------------------------------------------ |
| **Build a presentation** | Select the `pptx` Skill, attach a company deck as a template, and ask Craft to build a presentation from your source material. |
| **Search company knowledge** | Ask a company-specific question and let the `company-search` Skill retrieve information you already have permission to access. |
| **Navigate a website** | Select the Browser Skill and ask Craft to open a site, follow links, interact with pages, or take screenshots. |
| **Generate a visual** | Select the image generation Skill and describe the subject, composition, style, aspect ratio, and where the visual will be used. |
| **Standardize repeatable work** | Use a custom Skill to capture your team's process for reports, briefs, reviews, or another workflow you want Craft to repeat consistently. |
## Browse and inspect skills
Open **Skills** from the Craft sidebar to search everything available to you.
Select a skill card to preview its instructions before using it.
| Label | What it means |
| --------------- | -------------------------------------------------------------------------------------------- |
| **Built-in** | Maintained by Onyx. Availability can depend on your deployment and configured providers. |
| **Custom** | Created in your organization and shared with you, your group, or everyone. |
| **Personal** | Created and owned by you. It starts private, but you can share it if your permissions allow. |
| **Unavailable** | Visible for reference, but Craft cannot use it until its dependency is configured. |
Built-in skills currently cover presentations, company search, image generation, and website navigation.
The exact list you see depends on what your organization has enabled.
A skill's description tells Craft when to use it. If Craft repeatedly misses a custom skill,
make the description concrete about the tasks it covers, or select the skill explicitly in your prompt.
## Create a personal skill
Create a personal Skill when you have instructions, examples, or reference files you want to reuse across sessions.
Open **Skills**, select **Create skill**, then choose how you want to begin:
| Starting point | Choose | What happens |
| ----------------------------------- | ---------------------- | ------------------------------------------------------------------------------------------------------- |
| You want to write the Skill in Onyx | **Start from scratch** | The Skill editor opens so you can write the details and instructions, then add supporting files. |
| You already have a Skill | **Upload a skill** | Upload `SKILL.md`, a ZIP, or a Skill folder. Onyx reads the instructions and creates the Skill for you. |
Every new Skill is personal and private. After creating it, you can share it from the Skill editor.
### Start from scratch
Enter a name and describe when Craft should use the Skill. Onyx uses the name to create the Skill's identifier,
converting spaces and punctuation to hyphens when needed.
Describe the workflow Craft should follow, including important constraints, expected outputs, and checks.
Switch between the Markdown editor and preview to review the finished instructions.
Add references, examples, templates, scripts, or assets under **Supporting files**. You can select files or a ZIP,
or drag in a folder. Onyx unpacks ZIP files and preserves the directory structure.
Select **Create**. Onyx saves the instructions as `SKILL.md` and opens the Skill editor, where you can manage files,
sharing, and availability.
If you already have a Skill,
use **Import skill** at the top of the creation page to fill in the form and add its files.
If you have already entered content, Onyx asks before replacing the name, description, instructions,
and supporting files with the imported Skill.
### Upload an existing Skill
Upload `SKILL.md` directly when the Skill contains instructions only. When it includes supporting files,
upload a ZIP or drag in a folder with `SKILL.md` at the top level.
```text theme={null}
weekly-customer-update/
├── SKILL.md
├── examples/
│ └── finished-update.md
└── templates/
└── update-template.md
```
At minimum, `SKILL.md` needs a name and description in YAML frontmatter, followed by the instructions Craft should use:
```md theme={null}
---
name: Weekly customer update
description: Create a concise weekly customer update from meeting notes and account activity.
---
# Weekly customer update
1. Summarize material changes since the previous update.
2. Separate customer decisions, open risks, and next steps.
3. Name an owner and due date for every next step.
4. Follow the format in `templates/update-template.md`.
```
Put the instructions in `SKILL.md` and keep supporting files in the same folder. For a folder or ZIP,
use a lowercase, hyphenated name such as `weekly-customer-update`; that name becomes the Skill's identifier.
For a standalone `SKILL.md`, Onyx creates the identifier from its frontmatter `name`.
Open **Skills**, select **Create skill** > **Upload a skill**, and select `SKILL.md` or a ZIP.
You can also drag `SKILL.md`, a ZIP, or a Skill folder into the upload area. Upload one Skill at a time,
then select **Create**.
Onyx opens the Skill editor after creating it. Review the name, description, instructions,
and file tree before using or sharing the Skill.
### Update a Skill
Open a personal Skill to edit its name, description, or instructions. Under **Supporting files**, you can:
* Add individual files, ZIP files, or folders. New files are added to the existing bundle, and matching paths are
replaced.
* Browse the bundle as a directory tree and remove files you no longer need. `SKILL.md` cannot be removed.
* Upload content that includes `SKILL.md` to replace the current name, description, instructions, and files. Onyx asks
you to confirm before replacing the existing Skill content.
Changes are synchronized to people who can use the Skill. You can also disable the Skill without deleting it,
change its sharing, transfer ownership, or delete it.
Never put passwords, API keys, tokens, or production credentials in a skill bundle.
Use [Apps](/overview/core_features/craft_apps) for authenticated access to external services.
Review every script and file before uploading a bundle you did not create.
## Troubleshooting
Confirm the skill is enabled and shared with you. Unavailable built-in skills do not appear in the session picker.
If the skill depends on a model or deployment feature, ask an admin to configure that dependency.
Select the skill from **+** > **Skills** or type **/** and choose it before sending your prompt.
Also name the desired output and important constraints; a skill supplies a method, not the goal itself.
Upload one Skill at a time. Put `SKILL.md` at the top level of the folder. In a ZIP,
place it at the archive root or directly inside one enclosing folder.
Confirm that its frontmatter contains non-empty `name` and `description` fields. For a folder or ZIP,
check that its name is lowercase and hyphenated. If you started from scratch, try a different Skill name.
A custom Skill cannot use the same identifier as an existing or built-in Skill.
Publish organization skills, configure availability, and review custom bundles.
Give Craft controlled access to external tools and approve actions safely.