> ## Documentation Index
> Fetch the complete documentation index at: https://docs.okeanai.ru/llms.txt
> Use this file to discover all available pages before exploring further.
# Gmail OAuth
> Set up Gmail OAuth for the connector
This section walks through setting up the Gmail connector using a OAuth-enabled Google App.
Anyone can do this (even without a paid Google Workspace)!
If you're an organization with a Google Workspace, and you'd rather use a Service Account to access Gmail,
checkout the section [here](./service_account).
### Authorization
* [https://console.cloud.google.com/projectcreate](https://console.cloud.google.com/projectcreate)
* On the left panel, open **APIs & services**
* Go to **Enabled APIs and services**
* On the top click **+ENABLE APIS AND SERVICES**
* Search for **Gmail API** and click **ENABLE**
* Alternatively visit this [link](https://console.cloud.google.com/apis/enableflow?apiid=gmail.googleapis.com), select your project and enable the **Gmail API**
* Under **APIs & services**, select the **OAuth consent screen** tab
* If you don't have a **Google Organization** select **External** for **User Type**
* Call the app Onyx (or whatever you want)
* For the required emails, use any email of your choice or `founders@onyx.app` if you wish for the Onyx team to help handle issues.
* Click **SAVE AND CONTINUE**
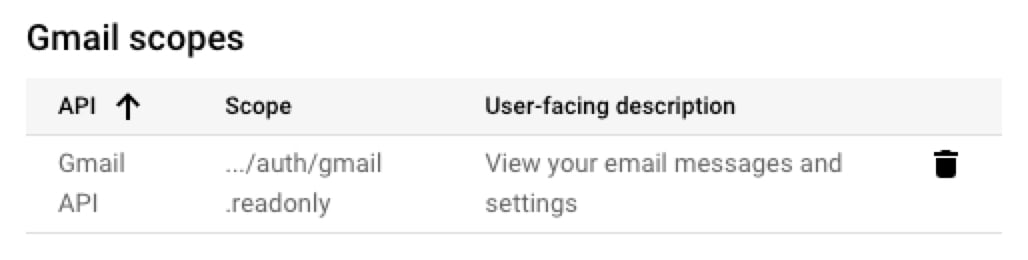
* Add the scope `.../auth/gmail.readonly` for `Gmail API`
To enable permission syncing for this connector:
* Enable the **Admin SDK API** (visit this link: [https://console.cloud.google.com/flows/enableapi?apiid=admin.googleapis.com](https://console.cloud.google.com/flows/enableapi?apiid=admin.googleapis.com)) and enable it for your project.
* Add the scope `.../auth/admins.directory.user.readonly` for `Admin SDK API`.
* Add the scope `.../auth/admins.directory.group.readonly` for `Admin SDK API`.
* The account performing the OAuth flow must have an Admin role in the Google Workspace that
has access to the "Groups > Read" privilege.
This can be set in the Google Admin Console under Account > Admin roles.
 * This is only applicable for users without a Google Organization.
* Add at least one test user email.
Only the email accounts added here will be allowed to run the OAuth flow to index new emails.
* Click **SAVE AND CONTINUE**, review the changes and click **BACK TO DASHBOARD**
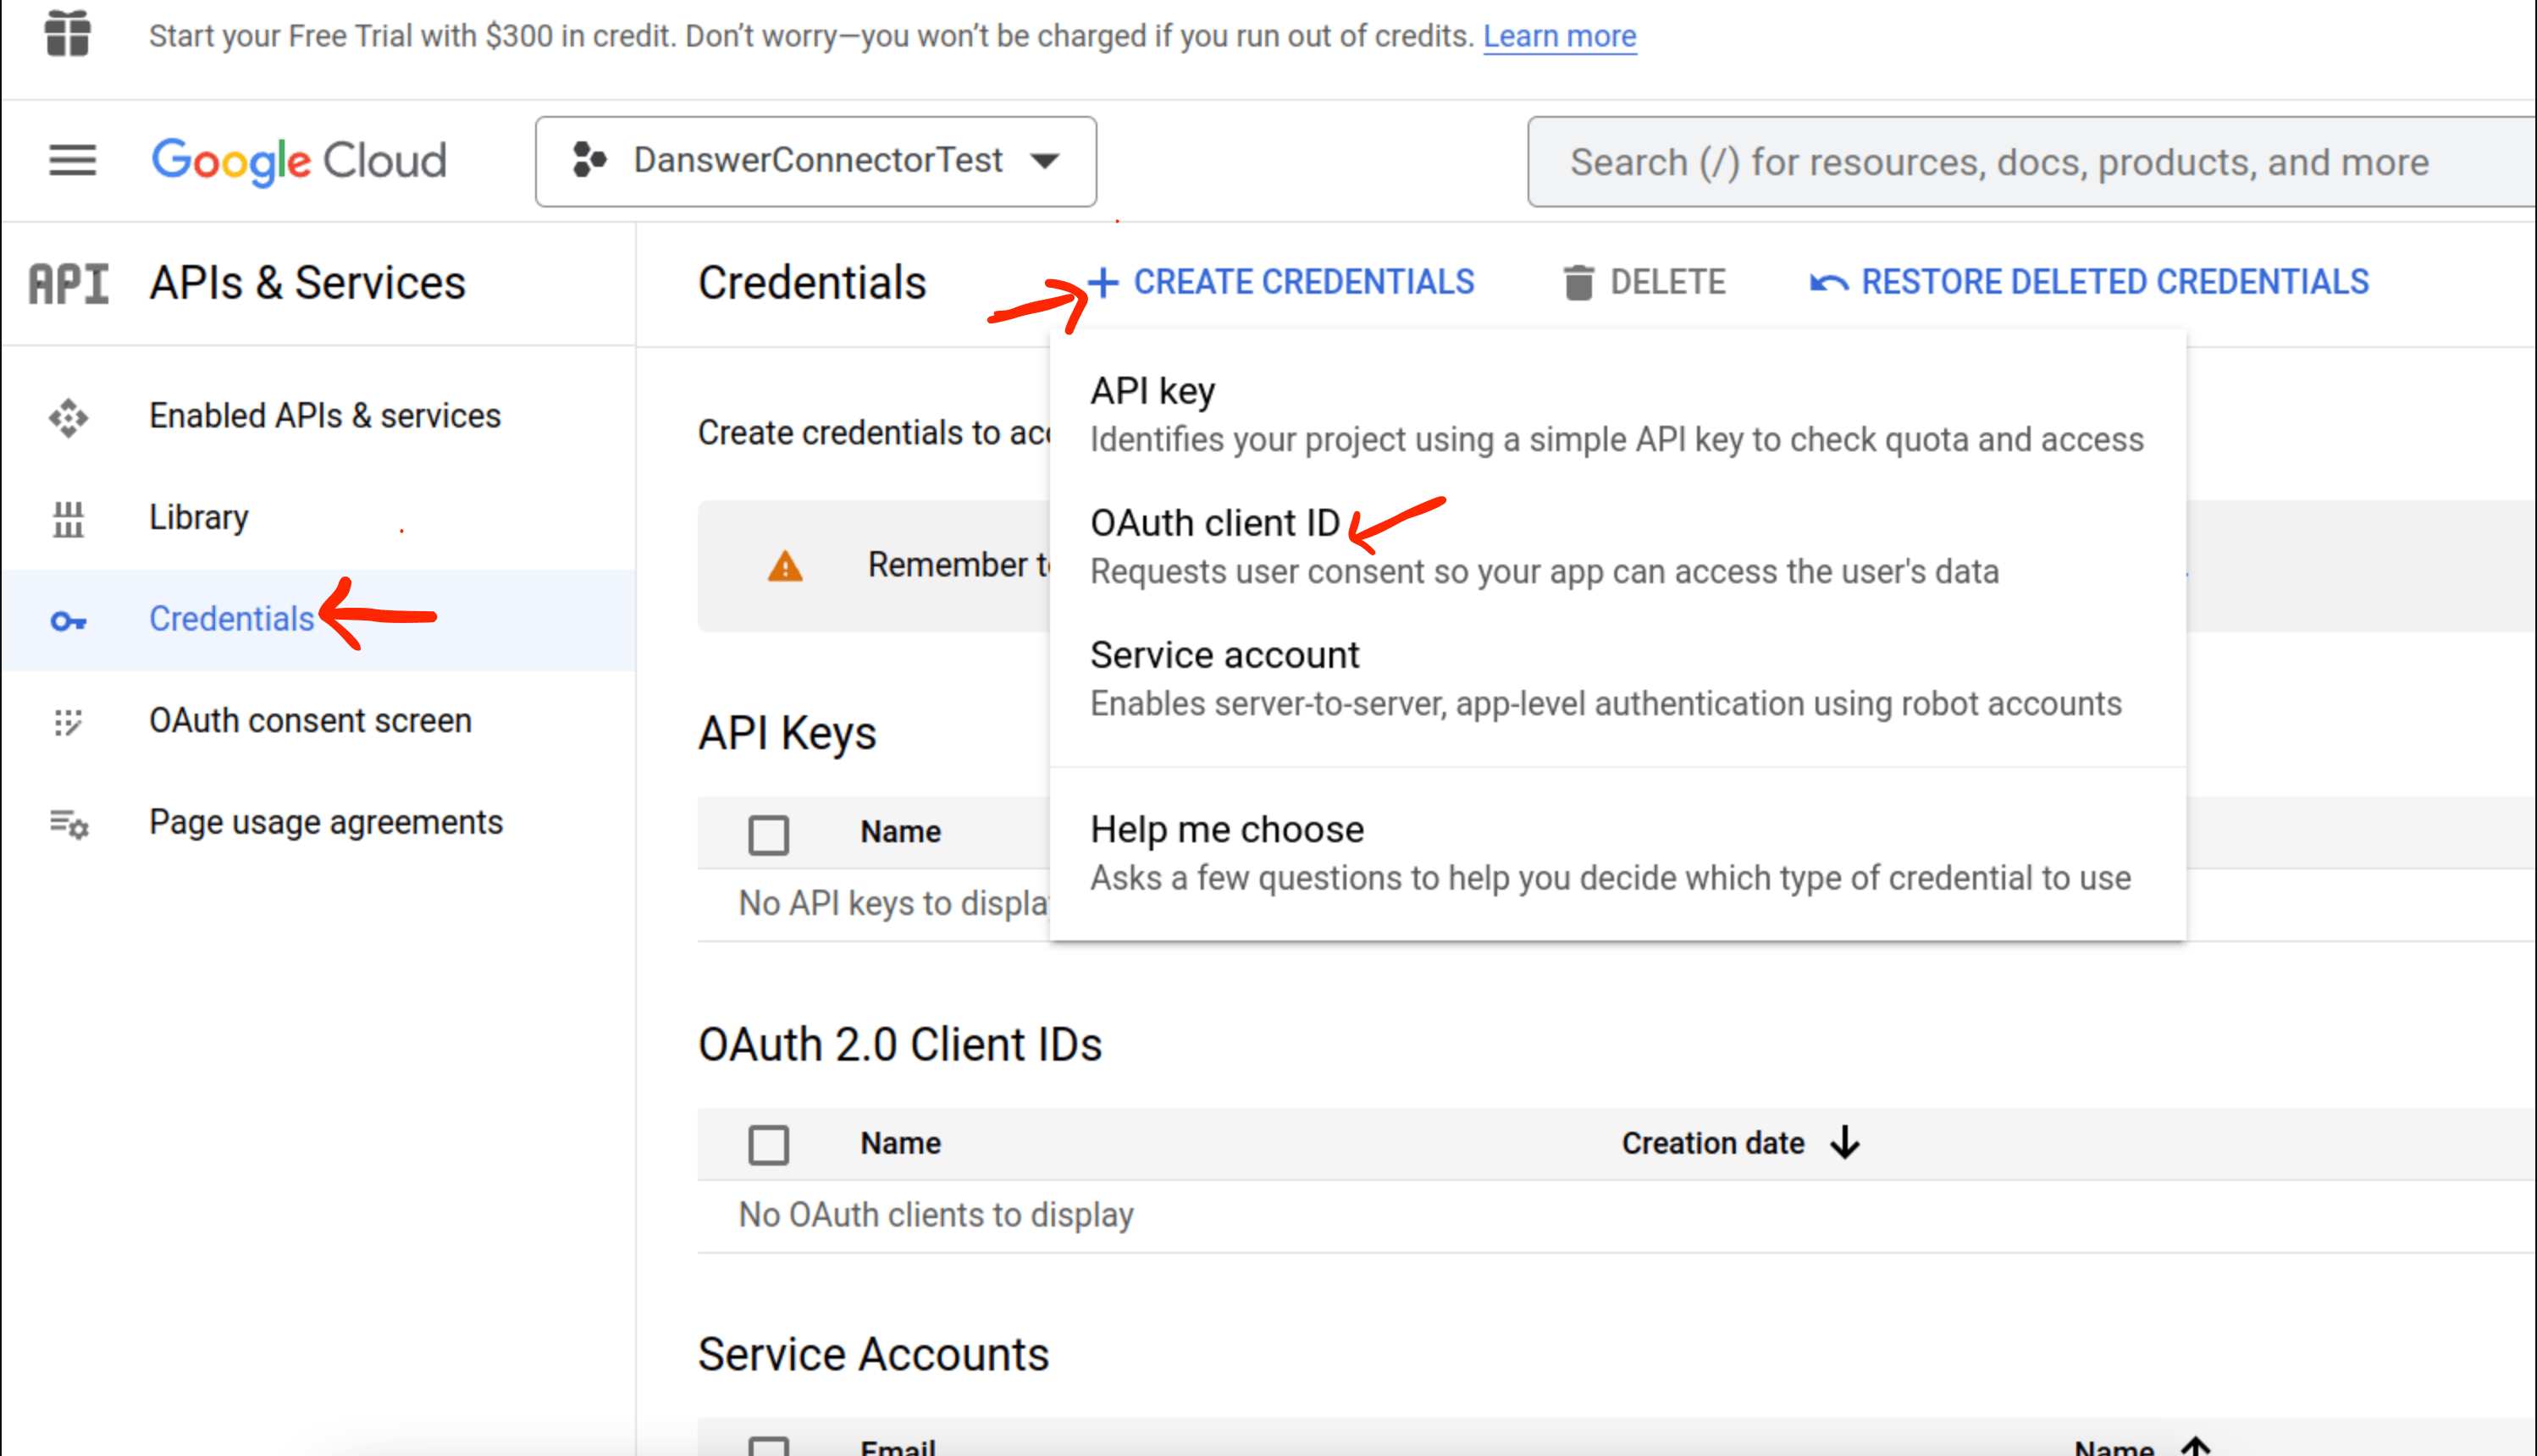
* Go to the **Credentials** tab and select **+ CREATE CREDENTIALS** -> **OAuth client ID**
* This is only applicable for users without a Google Organization.
* Add at least one test user email.
Only the email accounts added here will be allowed to run the OAuth flow to index new emails.
* Click **SAVE AND CONTINUE**, review the changes and click **BACK TO DASHBOARD**
* Go to the **Credentials** tab and select **+ CREATE CREDENTIALS** -> **OAuth client ID**
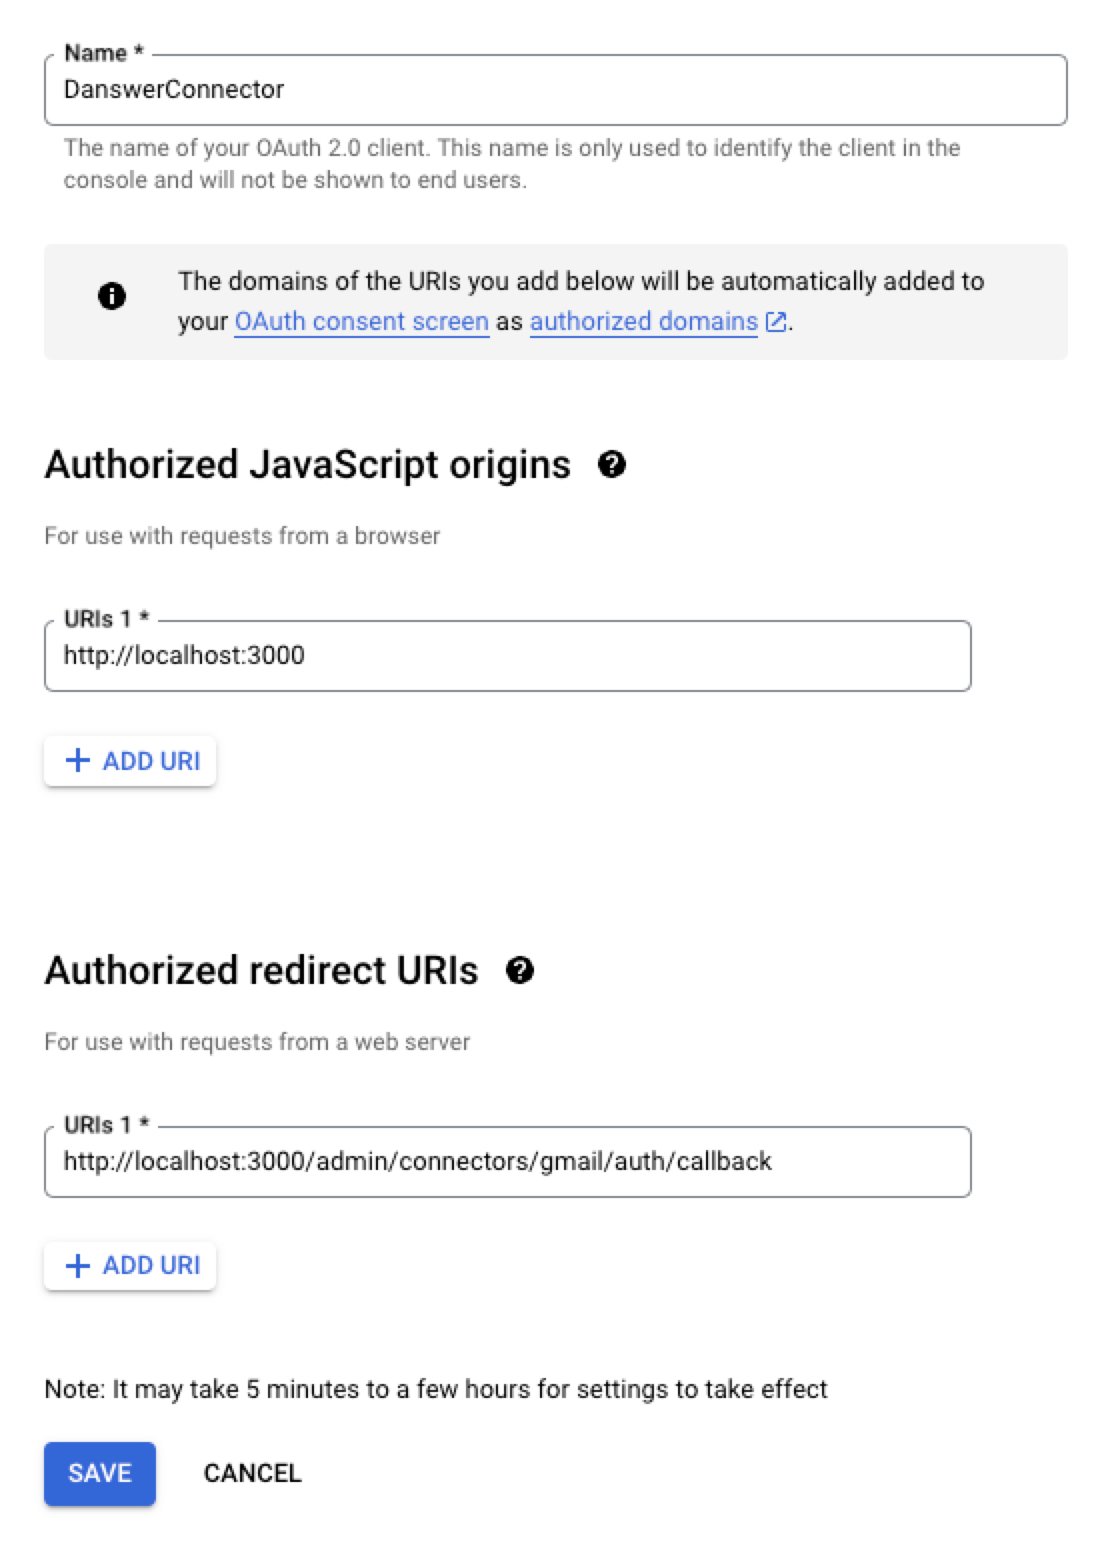
 * Choose **Web application** and give it some name like `OnyxConnector`
* Add an **Authorized JavaScript origins**
* `http://localhost:3000` if self-hosting
* `https://` if you have setup Onyx for production use
* `https://cloud.onyx.app` if you are using the Onyx Cloud service
* Add an **Authorized redirect URIs**
* `http://localhost:3000/admin/connectors/gmail/auth/callback` if self-hosting
* `https:///admin/connectors/gmail/auth/callback` if you have setup Onyx for production use
* `https://cloud.onyx.app/admin/connectors/gmail/auth/callback` if you are using the Onyx Cloud service
* Choose **Web application** and give it some name like `OnyxConnector`
* Add an **Authorized JavaScript origins**
* `http://localhost:3000` if self-hosting
* `https://` if you have setup Onyx for production use
* `https://cloud.onyx.app` if you are using the Onyx Cloud service
* Add an **Authorized redirect URIs**
* `http://localhost:3000/admin/connectors/gmail/auth/callback` if self-hosting
* `https:///admin/connectors/gmail/auth/callback` if you have setup Onyx for production use
* `https://cloud.onyx.app/admin/connectors/gmail/auth/callback` if you are using the Onyx Cloud service
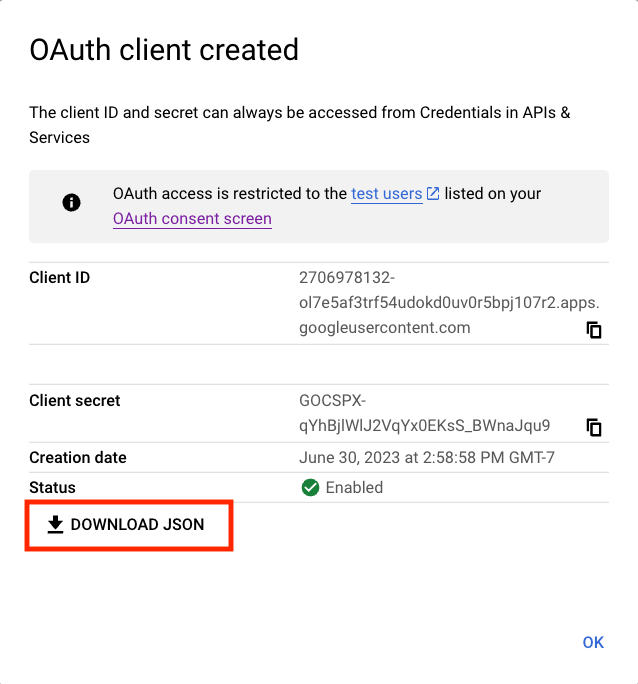
 * Click create and on the right hand side next to **Client secret**,
there is an option to download the credentials as a JSON. Download the JSON for use in the next step.
* Click create and on the right hand side next to **Client secret**,
there is an option to download the credentials as a JSON. Download the JSON for use in the next step.
 ### Indexing
First, navigate to the Admin Panel and select the Gmail connector.
Then, click **Create New**. Under **Option 1: OAuth app**, upload (or paste) the OAuth app JSON you downloaded above,
then click **Authenticate with Gmail**, then continue with the account you want to use to index Gmail.
Once complete, select the newly created credential, and click the **Continue** button to configure the connector!
The app JSON is stored on the credential it creates, so each OAuth credential carries its own app.
To add more connectors for the same account,
select the existing credential from the list instead of creating a new one.
An instance can hold multiple Gmail credentials.
### Indexing
First, navigate to the Admin Panel and select the Gmail connector.
Then, click **Create New**. Under **Option 1: OAuth app**, upload (or paste) the OAuth app JSON you downloaded above,
then click **Authenticate with Gmail**, then continue with the account you want to use to index Gmail.
Once complete, select the newly created credential, and click the **Continue** button to configure the connector!
The app JSON is stored on the credential it creates, so each OAuth credential carries its own app.
To add more connectors for the same account,
select the existing credential from the list instead of creating a new one.
An instance can hold multiple Gmail credentials.